Featured Recipe
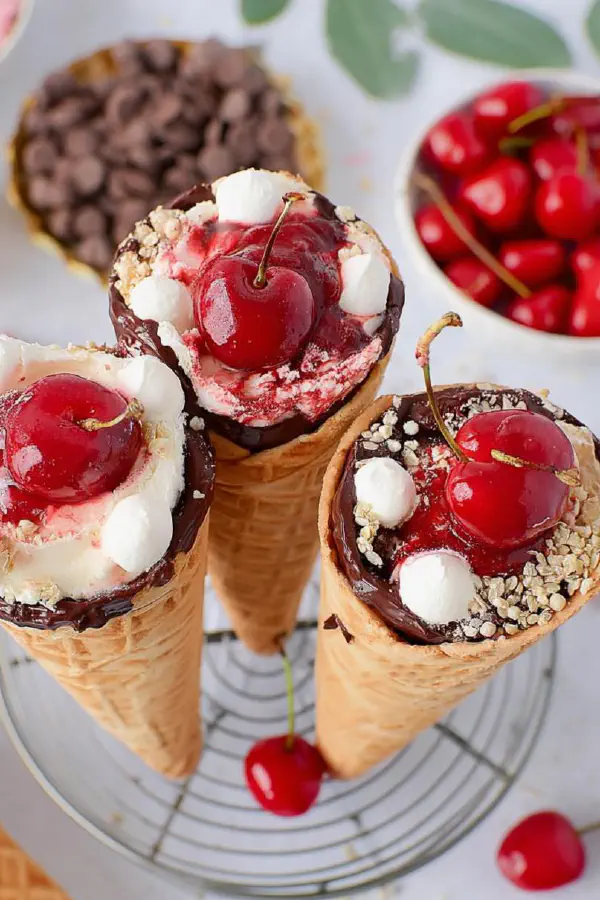
Cherry Cheesecake Cones Remix
By Kate
"
Chocolate-dipped cones filled with a tangy creamy cheesecake mixture and bright cherry compote. Greek yogurt swapped for mascarpone to add richness. Cones get a peppermint twist by adding crushed candy canes to the chocolate rim. Shortening replaced with coconut oil for a subtle aroma and smoother melt. Layered filling with alternating dollops creates balance between tart and sweet. Quick assembly; chill a few minutes if cones get soggy. Prep and finish under 12 minutes total. Efficient, no-fuss way to serve handheld cheesecake that won’t collapse.
"
Prep:
12 min
Cook:
0 min
Total:
12 min
Serves:
8 servings
dessert
cheesecake
cherry
chocolate
handheld
Introduction
Chocolate rims crackling as you dip. Peppermint shards tint dark chocolate rim. Cream cheese whipped with mascarpone, thicker, silkier. Heavy cream folding air into dense cream. Tart cherries burst between layers hugging graham crumbs. Sugary cones crisp. Cold bowl beats keep the texture light. Patience while chocolate sets, smooth and glossy, tells you when ready. Quick to whip, layers appearing like dessert jewels inside cones. Perfect winter variation, peppermint brightness cuts rich cream. Homemade handheld cheesecake with no fuss, keeping cones crisp if served fast. No soggy, no mess, just texture and flavor in every bite. Crunch, cream, and cherry meld — melt on tongue, not cones.
Ingredients
About the ingredients
Coconut oil replaces shortening for a tropical aroma and smooth chocolate texture when melted. Avoid using margarine or butter as they separate chocolate and can get grainy. Mascarpone adds richness over Greek yogurt, critical when skipping baking. Heavy cream should be cold to whip properly and avoid curdling when folding in other ingredients. Powdered sugar must be sifted to prevent clumps that ruin the velvety cream texture. Cherry pie filling is fine straight from a can but fresh or frozen cherries chopped and macerated with sugar bring a fresher, less sweet balance. Sugar cones hold the filling sturdier than cake cones which can get soggy quicker. Crushed peppermint candy is optional for a winter twist but adds crunch and flavor that cuts richness. If peppermint is too strong, swap with crushed toasted pecans or hazelnuts for nuttiness and crunch. Graham cracker crumbs add tactile element on top—substitute with crushed digestive biscuits or even cornflakes for crunch.
Method
Technique Tips
Microwave chocolate in short bursts; stop as soon as chocolate looks glossy and smooth. Stirring is key to avoid overheating or grainy clumps. Dipping cone edges while chocolate warm ensures good adhesion, sprinkle crushed peppermint immediately before chocolate hardens, so pieces stick better. Setting cones upside down or with rim upwards keeps rim shape crisp and chocolate unmessed. Use kitchen foil over a loaf pan poked with holes as inexpensive cone stand alternative. When whipping cream cheese and mascarpone, cold bowl slows warming, helps aeration and texture. Fold milk and vanilla gently; harsh beating breaks the cream structure. Add powdered sugar gradually, tasting to avoid oversweetening, which masks mascarpone’s tang. Assembling cones, layer filling gently, press lightly but not hard or cherries may burst and fill soggy cone. Graham cracker topping adds texture contrast; sprinkle last just before serving to maintain crunch. Serve cones right after filling for best texture or chill upright briefly but never more than 10 minutes to avoid soggy cones. Store leftover filling in airtight container refrigerated up to 2 days. Low on time? Use a stand mixer to speed whipping, hand beaters work but take longer. If cones get soggy sooner, wrap bottoms in foil to hold cone integrity longer.
Chef's Notes
- 💡 Chocolate: Melt in bursts. Stir often. Avoid overheating. Look for shiny, thick appearance. Coconut oil's aroma kicks in. Timing matters here.
- 💡 Peppermint crunch? Add right after dipping cones. Makes sticking easier. Use foil-lined pans for cone stands. Cone shape matters; ensure stability.
- 💡 Filling up cones with care. Layer wisely, cheesecake, cherries, repeat. Press gently. Avoid crushing fruit. Texture change signals readiness.
- 💡 Graham cracker topping adds a crunch layer. Keep it fresh. Wait until close to serving. Helps maintain that crunch. Timing key—crunch versus sog.
- 💡 Storage: Leftover filling? Airtight containers, fridge. Up to two days. Cones? Best served immediately. Otherwise, soggy cone syndrome.
Kitchen Wisdom
What if my chocolate seizes?
Check temp, don't overheat. Stir until glossy. Don't give up; heat control changes everything.
Can I use different fruits?
Absolutely! Think strawberries or blueberries. Macerate for balance. It's about your flavor preference.
How to fix a soggy cone?
Use sturdy sugar cones. Wrap bottoms in foil. Adds stability. Layering also counts—keep it light.
What about leftover filling?
Store in fridge, airtight. Good for two days. Re-whip if it thickens too much. Use for fruit dips.