Featured Recipe
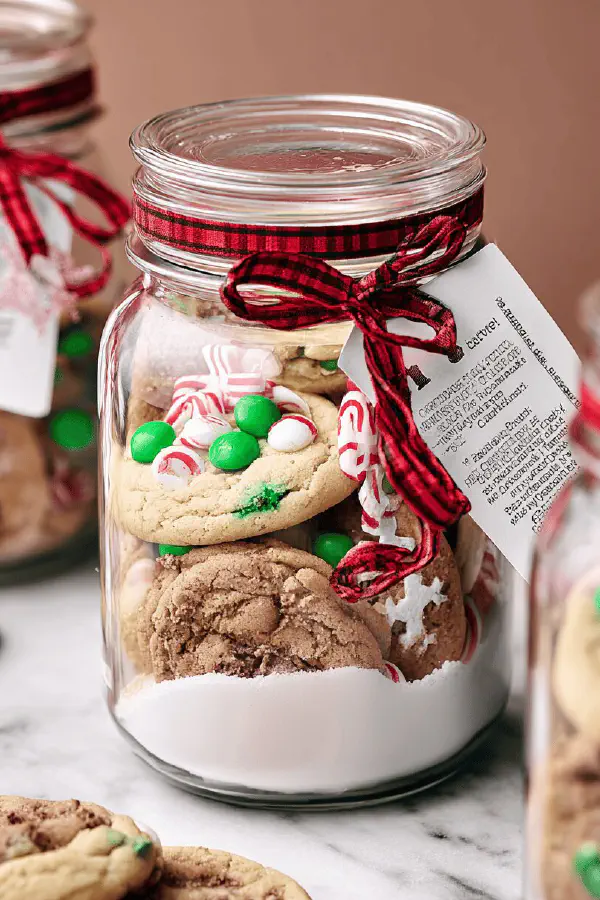
Holiday Cookie Mix Jar
By Kate
"
Layered dry ingredients assembled in a quart mason jar to create a ready-to-bake cookie mix. Flour, cornstarch, leaveners, and salt form the base. Brown and white sugars build sweetness and texture. Semisweet chocolate chunks and colorful candy coated chocolates top it off. The jar can sit as a gift or pantry staple. When baked with butter, egg, and vanilla, it makes chewy, colorful cookies with contrast between tender crumb and crunchy chips. Store leftovers in airtight container or freeze. A straightforward mix that requires only a few pantry staples and a reliable oven.
"
Prep:
7 min
Cook:
13 min
Total:
20 min
Serves:
24 cookies
cookies
baking
holiday treats
gifts
Introduction
Get your hands in on old school layering technique. No fancy gadgets. Few ingredients, straightforward methods. Flour blended with cornstarch stabilizes crumb — gives you that tender, not cakey texture. Brown sugar’s moisture, white sugar’s snap. Layer sugars separately to avoid clumping early on. Chocolate chunks hold up better under heat than chips — less melty mess. Candy-coated chocolates add color and crunch without bleeding dye if added last. Assembly kind of meditative: precise layers, gentle tapping to level. Seal jar tight, decorate if you want to gift it. When ready, simple steps for mixing wet then dry without overworking dough. Watch cookies carefully — centers stay soft while edges turn golden, smell shifts from sweet raw dough to warm chocolate comfort. Swirling the cookies right out of oven rounds off rough edges — a chef’s trick for show-stopping look. Cool completely or freeze for later. Pantry-friendly, versatile, day-to-night snack-ready. Perfect for gifting or a last-minute dessert win. Master this, and your holiday baking just got easier.
Ingredients
About the ingredients
All-purpose flour is your base; sift with cornstarch to stop toughness from extra gluten development. Cornstarch softens the crumb, absorbs moisture. Baking soda and powder together balance leavening for an optimal rise. Salt sharpens sweetness — don’t skip. Brown sugar brings chewiness, granulated sugar adds crisp edges; layering keeps sugars distinct so they don’t crystallize prematurely, preserving texture. Swap semisweet chocolate chunks with dark chocolate pieces (70%) for a richer bite. Candy coated chocolates can be replaced with white chocolate chips and chopped dried cranberries for seasonal twist. Butter must be softened, not melted — too warm and you’ll get greasy dough. Egg binds and enriches. Vanilla is non-negotiable; you can add almond extract for variation. Measure ingredients carefully; too much flour dries out cookies, too little causes spreading.
Method
ASSEMBLE THE JAR
- Use a wide mouth quart (32 ounce) mason jar. Start by layering the dry elements precisely. First measure and sift together the flour and cornstarch to avoid lumps. Add baking soda, baking powder, and salt directly on top to distribute evenly. Tap the jar firmly on the counter to level the mixture; helps avoid unevenness later.
- Next, carefully spoon in the packed brown sugar as a solid layer. Press gently to avoid mixing sugars together prematurely. Follow with granulated sugar, making sure to level and compress slightly for a clean layer.
- Top with semi sweet chocolate chunks. Avoid chocolate chips as they tend to melt or break down too fast. Then add the candy coated chocolate pieces as a final colorful layer - these keep shape and look festive. Seal jar tightly with lid. Decorate with a ribbon, small chalkboard tag or festive card for gifting.
- Heat oven to 355°F. Line two baking sheets with parchment paper or a silicone mat. Butter and high heat create crisp edges while parchment prevents sticking and browning too fast.
- Add softened butter, whole egg, and vanilla extract to a stand mixer bowl fitted with paddle attachment. Mix on medium speed for 2-3 minutes until mixture loosens and appears just creamed — it won’t be perfectly combined, that’s okay.
- Dump entire jar contents into the bowl using a spoon or spatula as needed. Mix on the lowest speed to combine dry with wet. Don’t overmix or you’ll develop too much gluten; cookies get tough. Note: remove candy coated pieces and fold in last by hand to keep their shape intact and prevent color bleeding.
- Scoop dough with a cookie scoop or tablespoon sized spoon about 1.5-2 tablespoons per cookie. Plop onto prepared sheets with 2 inches spacing. Dough will be soft but hold shape.
- Bake for 10-13 minutes until edges look slightly golden but centers appear soft and underdone. This visual is key—cookies continue to firm once out of oven. Don’t overbake or they’ll dry out.
- Right out of oven swirl a cup or round object gently around each cookie to round edges for uniform shape. Press a few extra candy pieces or chocolate chunks on top for presentation.
- Cool cookies 10 minutes on sheets, then transfer to wire rack to finish cooling. Store cooled cookies at room temp in airtight container up to 4 days or freeze tightly wrapped up to 3 months.
PREP AND BAKE
Technique Tips
Layer jar ingredients cold and dry to keep colors distinct; using a funnel or folding a paper plate helps prevent spills and mixing. Tapping compacts layers, prevents air pockets that might invert during baking. Cream butter and egg just until mixed; skipping over-creaming saves you from tough textures. Introducing jar contents slowly into butter mixture prevents flour clouds and uneven incorporation. Hand fold candy coated pieces last to preserve structure and color — prevents bleeding into dough. Baking time slightly longer than standard cookie ensures centers remain soft but edges crisp — watch closely, as ovens vary. Swirling baked cookies with a cup smooths edges for professional look. Cooling on sheets before transferring avoids breakage. Store in airtight container; moisture is enemy of crispness. Freeze leftovers to maintain freshness, thaw at room temp before eating.
Chef's Notes
- 💡 Layer ingredients carefully. Don't skip sifting flour and cornstarch—keeps it light, avoids lumps. Use a funnel maybe, less mess. Tapping jar helps keep layers neat, no air pockets. Air pockets can ruin even the best intentions in baking.
- 💡 Watch mixing speed. Medium speed for butter, egg, vanilla—just until mixed. Over-creaming leads to tough cookies, you want tenderness. Combine dry into wet on low speed, keep it gentle. No splatter, no flour clouds.
- 💡 Dough might feel soft. Scoop with a cookie scoop or spoon—1.5-2 tablespoons. Space them out, around 2 inches apart. They spread slightly. Makes a difference. Too close, no room to expand.
- 💡 Baking time is crucial. Check at 10 minutes, look for golden edges but soft centers. Underdone is key. They firm up after baking. If overbaked, goodbye chewiness. You want that contrast.
- 💡 Swirling cookies out of oven balances shape. Use a cup; press lightly on edges. A little finesse goes far. Decorate with extra candy pieces if you want—that's all about visual appeal. Looks matter.
Kitchen Wisdom
Can I use whole wheat flour?
Yes but texture changes, denser. Mix half and half if you want. Keeps chew but gains fiber.
I don't have eggs?
Try mashed banana or applesauce, works sometimes. Not perfect swap but adds moisture. Adjust other liquids if needed.
Cookies lost their crispness?
Store in airtight containers, no moisture. If too humid, added problems. Bake until edges light golden.
How to freeze leftovers?
Let cookies cool completely. Wrap tightly in plastic wrap, seal in freezer bags. They last longer—up to three months. Thaw at room temp.