Featured Recipe
Homemade Cocoa Mix
By Kate
"
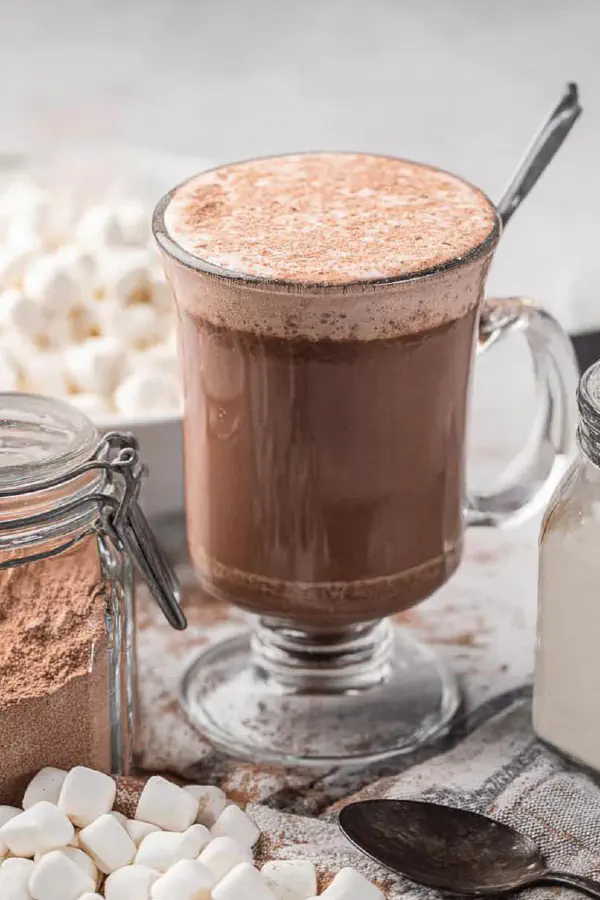
A quick blend of chocolate and spices yields rich cocoa mix powder. Use powdered sugar and cornstarch to balance sweetness and texture. Substitute semi-sweet chocolate with dark or milk chocolate depending on preference. The cornstarch thickens the drink when heated, making it velvety rich. Makes two servings of hot cocoa with a deep flavor and satisfying mouthfeel.
"
Prep:
20 min
Cook:
8 min
Total:
28 min
Serves:
2 servings
chocolate
beverages
DIY
Introduction
Chopped chocolate tossed with cocoa powder and cornstarch, spun into a fine, rich powder. Not a syrup, not a powder with weird bits—just a no-fuss blend any home cook can master. Forget the instant packets filled with weird fillers and artificial flavors. Instead, target quality ingredients and basic technique. You’ll quickly recognize the sound; the chop-crackle of chocolate shattering in the processor. Smell that cocoa mingling with warming cinnamon and a faint vanilla hint. Used dry, it’s shelf stable for a few weeks. Heat it gently; that’s when the cornstarch kicks in. Thickening. Clinging to your spoon. Sweet enough but not cloying. Trust the simmer over a rolling boil or microwave blast. Sensory cues tell you exactly when it’s done—not clocks. Simple substitutions mean no last-minute runs to specialty stores under pressure. Use milk or water depending on mood or pantry state. Sharp, mild, or rounded chocolate all work if chopped fine and blended thoroughly. Rough patches or gritty powder? Work slower in pulses in the processor. Too thick? Back off cornstarch next time slightly. The true cocoa flavors come alive all within minutes, and cleaning the processor is a breeze afterward. Reliable every time, a powder that won’t clump or burn.
Ingredients
About the ingredients
The chocolate bar is your base flavor bomb. Semi-sweet usually balances bitter cocoa and sugar well, but choosing bittersweet or sweeter milk chocolate adjusts body and sweetness. Dutch-processed cocoa has smoother acidity and deeper color. Powdered sugar dissolves quickly with no crunch; avoiding granulated prevents graininess. Cornstarch is the secret thickener—use it sparingly, too much makes cocoa gluey. Vanilla powder (optional) adds subtle aroma without watering down the cocoa. Cinnamon cuts through the richness and enhances chocolate notes naturally. Salt is tiny but powerful; it offsets sugar and sharpens all flavors. If you don’t have powdered vanilla, a few drops of vanilla extract mixed into the hot milk can work but avoid adding to the dry mix because of shelf stability concerns. Experiment with coconut sugar substitutions for deeper taste but it may affect texture. Sifting dry ingredients before blending helps prevent clumps and makes processing smoother.
Method
Technique Tips
Chop chocolate to rough even pieces before mixing to help the processor do the job faster and avoid overheating the motor. Pulse mode breaks down chunks without liquefying from friction heat. Stop early if you see small melted spots forming—blend lightly then stir manually to break lumps. Transfer to an airtight container once uniform. Moisture is enemy of shelf stability here—use a clean, dry spoon when measuring. When making hot cocoa, slowly heat milk rather than boil fast; rapid boil risks scorching bottom and bitter burnt flavors. Stirring constantly monitors thickness. Look for thin ribbons forming on the spoon’s surface as sign of proper cornstarch activation. The simmer’s subtle hiss and soft steam are key cues, not bubbles popping like a rolling boil. For water-based serving, powder mix may clump without a frother or vigorous whisk—adjust sugar to balance thinner mouthfeel. Adding salt during eating can brighten dulled flavor from water method. For cleanup, chocolate tends to coat container walls—scrape well to avoid waste. Avoid adding dry mix directly to cold milk; cold lumps result. Preheating milk just before mixing guarantees better blend. Using a whisk instead of spoon improves texture. Store in cool, dry place away from moisture or heat sources to keep texture intact over time.
Chef's Notes
- 💡 Chop chocolate evenly—helps processors work. Smaller chunks blend easier. Don’t overheat motor; you want powder, not goo. Stop if oil spots. Blend short bursts. Check often for texture refinement. Think about cornstarch; it’s vital. Too much? Cocoa glue, not drink.
- 💡 Dust with powdered sugar; dissolves quick, avoids grain. Granulated sugar? No thanks. That’s gritty. Add cinnamon and salt; they balance. Vanilla optional, but worth it. Stick to dry mix for shelf life. If using extract, add to milk, not dry. No lumps!
- 💡 Use Dutch-processed cocoa for richer taste. Swapping sugar? Coconut sugar works but affects texture. Be mindful of substitutions. It'll change consistency. Store in cool, dry places. Avoid moisture. Wetness ruins it. Airtight container is key.
- 💡 When making cocoa, heat milk slow. Don't boil hard. Monitor bubbles on edges; that’s your cue. Stir constantly; keeps it from scorching. For thicker texture, simmer longer. Look for coating on spoon; that means cornstarch activated. Thin? Adjust mix.
- 💡 Mistakes happen. Overheating chocolate? Ruins texture. Rapid boil? Turns bitter. Take it easy with heat. Listen for simmer sounds, look for steaming edges. Clean processor well; chocolate likes to cling. Scrape down walls to avoid waste.
Kitchen Wisdom
How long does cocoa mix last?
Keep dry, airtight for 2-3 weeks. Moisture is the enemy. Check often, seal tight.
Can I use water instead of milk?
Yes, but thinner texture. Whisk vigorously; it helps avoid clumps. Watch sweetness. Adjust to taste.
What if mixture is too thick?
Back off cornstarch next time; less gluey. Run milk slower when heating. Think gentle.
Storage tips?
Use airtight container, cool and dry. Avoid warm spots. No moisture; that’s crucial. Use clean, dry spoon when accessing.