Featured Recipe
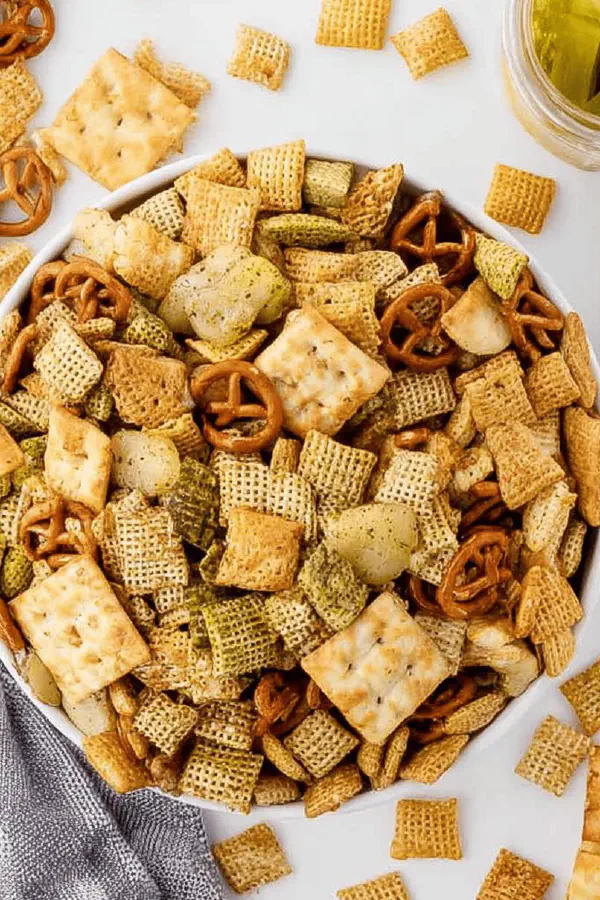
Zesty Dill Pickle Snack Mix
By Kate
"
Crunchy medley with cereals, nuts, bagel chips, tossed in tangy dill ranch pickling blend. Bakes low and slow to toast and crisp, layers of flavor develop with browning edges and aromatic dill. Ranch seasoning plus garlic salt anchor the pickle punch. Uses corn nuts swapped for wasabi peas. Bagel chips replaced with thin pita crisps for texture shift. Stir often, watch for golden edges not burnt. Oven smell woody with herbs, salty tang. Store airtight to keep crisp. Snack that rewards patience and attention with lively textures and bold seasoning.
"
Prep:
15 min
Cook:
35 min
Total:
50 min
Serves:
12 servings
snack
dill pickle
oven roasted
party mix
spicy mix
Introduction
Crunch time for snackers who know the value of low and slow roasting. Dill pickle undertone not just by pickle juice but in perfect balance with ranch herbs and garlic. You want even drying to prevent chewy bits. The swap of wasabi peas for corn nuts adds unexpected heat and more crunch, pita crisps replace bagel chips with lighter edges and airy crunch. Simple technique to toss, coat evenly, and slow roast to lift the aromas and crispiness. Don’t underestimate patience and the stirring ritual here - that separation and redistribution help avoid baking lumps and soggy spots. The oven becomes a scent station with woody dill and savory hints with toasted nuts warming up the kitchen. Once cooled, snatch handfuls and taste the rough textures with the acid snap. Store airtight or risk losing that snappy crack. This approach champions fundamental snack prep – control, timing, and respect for drying. If your mix looks sticky? Oven temp too high or seasoning puddled. Keep it loose, dry, move pieces often. Done right every crunch sings.
Ingredients
About the ingredients
Cereals are the backbone. Rice and corn Chex mix to balance textures: rice light and airy, corn crisp and sturdy. Wasabi peas are a bold substitute for corn nuts, offering a hint of heat - you can shift back to original or swap with dry roasted soy nuts if preferred. Thin pita crisps replace bagel chips for lighter crunch and less density, but bagels can return if you prefer heavier crunch. Mixed nuts bring oils that toast and add richness - salted or unsalted works but adjust garlic salt if salted. Ranch powder delivers herbs and seasoning base – look for good quality, don’t overhaul with fresh herbs here or balance shifts. Dill weed is crucial for pickle vibe. Garlic salt adds punch but keep balanced or too salty. Vegetable oil carries flavors, use neutral like canola or sunflower if preferred. Pickle juice injects unmistakable tang and moisture to bind seasoning but use fresh dill pickle juice to avoid off flavors. Avoid heavy oils or butter; they alter crispness and risk sogginess.
Method
Technique Tips
Oven temp lowered slightly; prevents scorching, encourages slow drying, and aroma development. Use parchment on pans for even heat and cleanup. Toss cereal mix gently but thoroughly to mix all crunchy elements uniformly. Whisk liquid seasoning well for even flavor dispersal. Apply liquid gradually and stir well after each drizzle to prevent clumps or over-saturating spots. Work quickly to spread and separate on trays as moisture starts working on cereals fast. Thin layers in roasting pans mean more even heat penetration and crisping. Stir every 12-15 minutes – wait longer and you risk burning or uneven drying. Listen for faint crackle, look for golden edges, especially on nuts and pretzels; when any spot browns too fast, adjust stirring frequency or oven rack height next time. Cooling is as critical as baking – residual heat finishes crisping and prevents steam sogginess sealed in container. Store in airtight containers only after fully cooled or risk losing crispness. If mixture seems sticky the next day, it’s underbaked or stored warm in sealed air; spread out and re-bake quickly if rescue needed.
Chef's Notes
- 💡 Oven temp crucial. Too high? Mix burns. Aim for 240°F. Low and slow lets flavors develop. Stir often, keep an eye. Golden edges mark done.
- 💡 Ingredient swaps work wonders. Want a different kick? Use roasted soy nuts instead of wasabi peas. Skip pita crisps for garlic-flavored chips. Always adjust.
- 💡 Mix texture with layers. Thin layers on baking sheet ensure even cooking. Clumps can lead to soggy spots or uneven drying. Aim for separation.
- 💡 Stir every 12-15 minutes, listen for crackling. Smell that? It’s herbs toasting, nuts browning. Watch carefully; color change means progress.
- 💡 Cooling phase matters. Let it sit till it cools completely. Steam creates sogginess if it’s stored warm. Keep it crisp, invest patience.
Kitchen Wisdom
What if my mix is soggy?
Possibly underbaked. Check oven temp, and extend baking if needed. Store only after fully crisped. Soggy means moisture.
Can I change seasonings?
Absolutely! Try different ranch spices. Experiment with garlic powder or smoked paprika. Balance flavors but stay cautious.
How long can I store the mix?
Store in airtight containers. Keep moisture out. Best within a week. Crisp can turn soft fast if stored poorly.
I want less heat. Options?
Skip wasabi peas altogether. Just use corn nuts or leave them out. Adjust garlic salt, keep balance. Gentle flavors work.